Flash + AR / X3DOM Mashup
This tutorial describes how to create a simple desktop augmented reality scene. We are using Adobe Flash based FLARToolkit for marker tracking and X3DOM for rendering of the 3D scene. By Jens Keil and Michael Zoellner.
At a glance
The tutorial shows the first online Augmented Reality application with Plugin-free hardware accelerated rendering on a GPU. Having the advantages of browser-supported WebGL technology, there is no need to download any kind of plug-in anymore to create Augmented Reality inside web browsers. Its a fast, simple and declarative way to integrate 3D content into HTML and bases on well known and documented standards, like HTML 5, CSS and JavaScript.
Although the tracking still uses Adobe Flash, its modular enough to change and switch tracking as soon as there are native standards for camera access available.
How does it work?
Our FLARToolkit marker tracker shows the webcam in the background and sends a model view matrix of the recognized marker to a Javascript function in the HTML file. From there the MatrixTransform around a bunch of 3D objects in the X3D scene is set with these values.
Setting up FLARToolkit marker tracker
Don’t worry. You don’t need the Flash IDE or any Actionscript knowledge for this tutorial. We are providing a compiled FLARToolkit marker tracker ready for including into an HTML page. It consists of the compiled SWF file (x3domflartoolkit.swf) and a Data folder with the camera parameters (camera_para.dat) and the marker pattern (x3dom.pat). You can change the marker by creating a new one with the pattern generator, putting the results into the Data folder and renaming it to x3dom.pat. Please note that you should keep the generator’s default values for marker resolution and segment size of 16×16 and 50% in order to work properly.
Including the FLARToolkit marker tracker
The compiled SWF is included via object and embed tags into the HTML page. It calls the Javascript function:
set_marker_transform(value)
as soon as it recognizes a marker in the video. The exchanging values include the marker’s position and orientation. As mentioned, they are used to set the 3D object’s position and rotation.
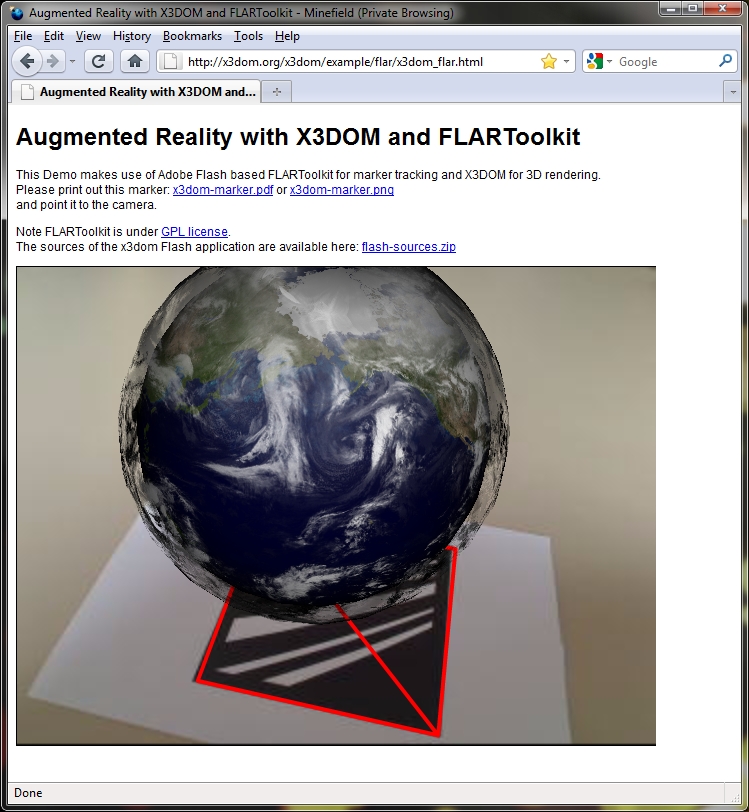
A simple 3D Scene
The demo scene shows a simple AR application: The earth globe, which hovers above the marker. A second layer shows the actual clouds surround the whole planet; live data loaded into the 3D scene.
Our demo is declared in HTML and structured in several divisions. Both, the 3D content and the compiled SWF, are grouped inside two several <Div /> nodes. The layer containing the 3d markup is styled with CSS and positioned on top of the compiled flash movie. Note that both have to have the same size and position in order to achieve a well augmentation effect.
Then, we set up a <MatrixTransform /> node, which groups every 3D object we want to be positioned on the marker. Inside we declare a simple <Sphere /> geometry and texture it with a png file of earth’s appearance. Around the first one, we place a second <Sphere /> object at the same position but with a larger scale and texture it with the transparent cloud data.
The basic structure
<x3d>
<scene>
    <viewpoint fieldOfView='0.60' position='0 0 0'></viewpoint>

     <matrixtransform id="root_transform">
             <transform  translation="0 0 20" scale="50 50 50"
             rotation="0 1 0 3.145">
                     <transform def="earth" rotation="1 0 0 -1.57">
                             <shape>
                                     <appearance>
                                             <imageTexture url="some_texture.jpg">
                                             </imageTexture>
                                     </appearance>
                                     <sphere></sphere>
                             </shape>
                     </transform>
                     <transform def="clouds" rotation="1 0 0 -1.57"
                     scale="1.1 1.1 1.1">
                             <shape>
                                     <appearance>
                                             <imageTexture url="some_texture2.jpg">
                                             </imageTexture>
                                     </appearance>
                                     <sphere></sphere>
                             </shape>
                     </transform>
             </transform>
     </matrixtransform>
</scene>
</x3d>
You don’t need to calibrate your webcam. All of this is handled by the tracker’s camera_para.dat file. Hence, our <Viewpoint />, i.e. our 3D camera, is fixed in its fieldOfview 0.6 and position of 0. The tracker’s values only change and transform our 3D objects; not the camera.
The Javascript functionality
After declaring the 3D content, we add the Javascript code, that handles the data exchange between the Flash based marker tracking and our 3D scene.
First, we declare a function that hides the X3DOM canvas with the 3D content after the document has loaded. The user needs to allow the Flash tracker to access his camera by clicking a button. This is not possible, when x3dom is rendered on top at start up. As soon as the user confirmed and the marker is detected, we show the 3d content up again.

Our code:
var show_canvas = false;

 // Hide x3dom canavs on page load
 $(document).ready(function() {
    $('#topLayer').hide();
    show_canvas = false;
 });

// Show x3dom canvas again
// function is triggered inside set_marker_transform()
function show_x3dom_canvas(){
    $('#topLayer').show();
    show_canvas = true;
}
Lets take a closer look to the data exchange between X3DOM and the optical tracking:
We declare the set_marker_transform(value) function, which is expected by and triggered from inside the flash tracker. The function sets the new values for the MatrixTransform’s position and rotation. Then we fetch the root MatrixTransform node
var root_transform = document.getElementById('root_transform');
and update the values with the setAttribute(attribute, value) function
root_transform.setAttribute('matrix', q.toString());
Since the tracking triggers new values for every (video) frame, the position is updated as long as the marker is detected. Note, that we also need to convert the received marker values, since X3DOM’s and the tracking’s coordinate system don’t match.
Our code:
//This function is triggered by flash based tracking
function set_marker_transform(value) {
var q = value;
var root_transform = document.getElementById('root_transform');

// if not enabled, show x3dom canvas
if(!show_canvas)
    show_x3dom_canvas();

// Convert rotation form left to right handed coordinate system
// mirror z
q[2][3] = -q[2][3];
q[0][2] = -q[0][2];
q[1][2] = -q[1][2];
q[2][0] = -q[2][0];
q[2][1] = -q[2][1];

// update the grouped 3d object's matrixTranform
root_transform.setAttribute('matrix', q.toString());
}
The tracking also gives feedback when the marker is lost. If you want to work with this information, just declare and use this function inside your Javascript:
function on_marker_loss(value){
    //marker not detected anymore, do something
}
Trouble shooting
Sometimes the 3D content doesn’t show up. This may have two reasons: Be sure you are using a browser who supports WebGL. Also texture loading may take a bit longer and hence may take X3DOM several seconds until the geometry shows up.
You can also control if the marker tracking is working: Check, whether there is a red outline around your marker. If not, ensure the marker is on a plane surface, not occupied and there is enough ambient light.